Basic Remedial Treatment
Basic remedial treatment is intended to make materials usable and to ensure that they won’t require major treatment down the road. With the appropriate tools and supervision, a well-trained technician should be capable of carrying out basic treatment.
Paper materials
Paper materials such as archives, holographs, typescripts, maps, and posters need to be carefully examined prior to organized housing, especially when materials are newly acquired. Paper should be checked for metal fasteners, adhesive tape, soiled surfaces, tears, and the presence of mold or insects. Serious conservation problems should be flagged and/or listed for further attention.
Metal fasteners
Metal fasteners include staples, paper clips, straight pins, prong fasteners, and clamps. Harmful metal fasteners must be removed because rust and corrosion will damage paper, and metal points will cause tears and other damage. Removal should be done with care. Considerable damage can be caused by roughly pulling away a staple or paper clip.
Staples should be pried away first by lifting the “legs” with a flat spatula or other thin flat instrument. If the paper is thin or deteriorated, a small piece of polyester film should be used to protect the surface from the spatula.

Paper clips should be removed by prying up the fronts, backs, and leading edges before pulling them away. In some cases, rubber bands have been used to hold groups of paper records, and these should be removed even in good condition. If the rubber bands have deteriorated badly, freezing them will embrittle the rubber so that fragments can be gently broken off.
Separated leaves can be reattached with special stainless steel paper clips over small strips of alkaline paper.
If there are only a few loose leaves, they may be left loose in a folder. Stainless steel staples may be used if the paper is sound and the staples are pushed through strips of alkaline paper to protect the original sheets. This also has the effect of signaling that the staple or paper clip is stable.
Adhesive tape
This pressure-sensitive tape can be difficult to remove. Such tape is usually applied to remedy damage to paper, and further damage can be caused upon removal. Removal is best left to a conservator with the appropriate equipment and solvents.
Soft-paper tissue
Soft-paper tissue, such as Japanese-type long-fibered mulberry paper, is the preferred method of mending, filling, and reinforcing damage. Soft-paper tissue is strong, and its long fibers allow for sound “edge-to-edge” attachment in the filling of losses. The adhesive used must be completely water soluble for reversibility (preferably a starch made from rice or wheat) or methyl cellulose.
To repair a tear, a narrow strip of tissue should be torn to size. The tissue tear line can be delineated by a narrow line of water from a water pen or by indenting the tissue surface with a needle. This to weaken the tissue at the tear line. Starch paste and/or methyl cellulose is mixed to a creamy consistency, the strip laid onto a non-stick surface such as polyester film, and the paste applied with a small soft brush. The strip is then gently placed over the tear and allowed to dry between sheets of blotting paper under a light weight.
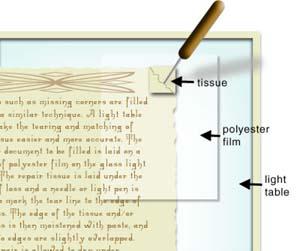 Losses such as missing corners are filled using a similar technique. A light table can make the tearing and matching of the tissue easier and more accurate. The leaf or document to be filled is laid on the glass light table. A piece of polyester film is laid over the document. Lightly dampen the repair tissue and stick it on the film. A needle or light pen is used to mark the tear line to the edge of the loss.
The edge of the tissue and/or the loss is then moistened with paste, and the two edges are slightly overlapped. The repair is allowed to dry under weights. Holes in paper, usually caused by insects, can be filled by the careful application of small pieces of tissue or by paper pulp. A machine called a leaf caster can also be employed to fill holes and other losses.
To provide overall reinforcement, the tissue is pasted with a thin, even layer of paste/methyl cellulose and placed over the damaged sheet. Dampening the damaged sheet with a fine spray prior to lamination and using polyester film to handle the wet tissue and sheet will enhance drying. The sheet should be dried between sheets of spun polyester and sheets of blotting paper under a weight. It is extremely important to ensure that the text or image is stable when wet. “Silking,” once a popular strengthening technique, is now out of favor because silk darkens and discolors over time.
**Polyester film **encapsulation
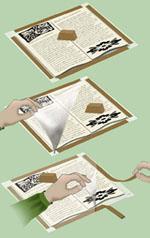
A method of single-sheet paper support that has won favor in recent years because of its total reversibility is polyester film encapsulation. In this method, the damaged sheet is sandwiched between two sheets of polyester film (Melinex type 516). The film should not contain plasticizers or surface coating, or be a plastic other than polyester. The film is sealed around the edge using either double-sided adhesive tape, heat welding, sewing, or ultra-sonic welding. Encapsulation relies on the electrostatic nature of the polyester to support the document, but this property can be detrimental to text and images created with unstable media, such as pencil or charcoal, as it can remove the image from the paper. Because the deterioration of acidic materials can be accelerated by complete enclosure, some documents can de-acidified prior to encapsulation. Alternatively, if the text or image is only on one side of the document, a single sheet of alkaline paper should be cut to size and placed in the encapsulation with the document to create an alkaline environment. Documents should be clean and dry before encapsulation. For some documents, complete encapsulation may not be necessary, and polyester sleeves can be purchased and used. For large, single-sheet documents such as maps or posters, encapsulation is an excellent solution providing flat storage is available.
To encapsulate a document, two pieces of 3 or 4 mil polyester film are cut roughly 7 centimeters larger than the width and length of the document. The document is centered on one of the polyester sheets and weighted down. If double-sided adhesive tape is used, it should be applied to the polyester sheet approximately 3 millimeters away from the edge of the document. The weight is then carefully removed from the document, the top polyester sheet is placed on top of the document, and the weight is put back on. The top protective layer of the tape is removed along one edge by lifting the edge of the top polyester sheet. The film is pressed down to adhere to the tape, then the protective tape layer on the other edges is removed and the film smoothed down with a soft cloth or squeegee to squeeze out the air. Excess film is trimmed away roughly 3 millimeters from the outer tape edge.
Polyester welding equipment is either heat (radio welding) or ultrasonic. The radio welder uses a heat bar that effectively seals and cuts the polyester. Radio welding, though cheaper than ultrasonic, thickens a sheet’s edge, which is problematic when several sheets must lie on top of each other. The ultrasonic machine welds the polyester with a head that moves across it at a regulated speed. The advantage of ultrasound is that a weld may be placed at any point on the polyester—not just the edge—and it doesn’t cause thickening.
Cleaning soiled paper
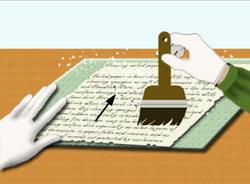
Soiled paper is best cleaned with soft brushes, cleaning sponges, or soft vinyl erasers (Magic Rub and Staedtler Mars). A soft brush does the least surface damage and works well for materials with loose dust. Brushes that are flat, wide, and white (to indicate when the brush is dirty) are best for this purpose. Dry cleaning sponges made from vulcanized natural rubber, originally intended for soot removal following fire damage, may also be useful for reducing surface dirt, especially on outer layers of rolled documents, in paper folds and creases, and on the top layer of records not protected by enclosures.
The soiled document is placed on a clean work surface. A padded weight is placed in the center of the document. The document should be completely dry and tested to ensure that the surface is not likely to be damaged by the eraser. The document is first lightly brushed with a soft brush to remove loose soil. The eraser should be applied lightly and in the non-text or image areas, especially when there are penciled annotations or other vulnerable media that could be accidentally removed. The technician should avoid touching the document with his/her bare hands by wearing cotton gloves. All bracelets and rings should be removed. During dry cleaning, particles should regularly be swept away with a soft brush. If the paper is fragile or has a soft surface, cleaning might have to be limited to light dusting with a soft brush.
The work surface should be kept as clean as possible by dusting away the debris with a soft duster, checking under the edge of the document for stray particles, or aHEPA vacuum cleaner. The document itself should not be vacuumed because of the risk of damage from the metal parts.
Unrolling materials
Unwrapping tightly rolled paper materials, which are often brittle, can cause tears and breaks. Moreover, materials that have been rolled for some time tend to want to return to their rolled configuration. Thus when rolled materials need to be flattened, it may be necessary to introduce humidity to relax the paper fibers. Before flattening, make sure there is adequate storage for large, flat items.
Humidity should not be introduced to heavily coated paper, parchment/<a href="/glossary#Vellum" title=“Originally, a translucent or opaque material produced from calfskin that had been soaked, limed and unhaired, and then dried at normal temperature under tension, usually on a wooden device called a stretching frame. Now, “vellum” is often used interchangeably with “parchment”.
" class=“lexicon-term”>vellum, and materials with highly soluble inks, pigments, or other colors that might be affected by a high level of moisture. Generally, the principle of concentrating humidity is to create a micro-environment that can be controlled. A humidification chamber can be fabricated from any reasonably air-tight, rust-proof container, including plastic trash containers of various sizes, a refrigerator, rigid plastic trays, or plastic sheets.
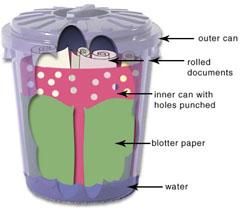 A trash container can be used for large rolled materials, such as maps or architectural drawings. A smaller plastic container is needed to contain the documents inside the larger container. To increase the circulation of moist air, the smaller container should have a few holes cut into the sides, close to the top. About 8 centimeters of water is placed in the bottom of the large container. Sheets of blotting paper are laid around the inside of the large container and in the water. The blotting paper will help moist air permeate the container. The small inner container should be left open, and the large container should be sealed tight.
When the paper is relaxed enough for safe opening, the rolls should be removed. The time taken to attain an appropriate level of relaxation varies according to the nature of the paper, with thin paper taking around half an hour and thick paper taking considerably longer. Paper has achieved the right level of humidity when it feels pliable and seems to open easily. When the paper has been removed, it should be handled very carefully to prevent tearing, then gently unrolled and laid onto a sheet of clean blotting paper. Another sheet of blotting paper is placed on top along with a rigid board and a weight. A number of documents can be piled up with layers of blotting paper separating them in a vertical pile.
About fifteen minutes later, the blotting sheets need to be exchanged for dry ones. If the room is very humid, direct an electric fan on the piles to reduce the chance of mold developing. When the documents are thoroughly dry, which can take up to two days, the documents should be placed into their folders and enclosures.

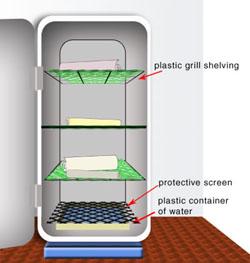
If a refrigerator is used as a humidification chamber for smaller documents, it should be unplugged, and the metal shelves removed and replaced with plastic grill shelving (egg-crate-shaped panels from light fixtures are ideal). A plastic container of water is next laid onto the bottom of the refrigerator with a screen on top to protect falling documents from complete immersion.
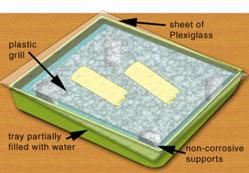 Smaller single documents can also be humidified with a rigid photographic tray. Rigid plastic grill material is placed on the inside of the tray with the corners supported by non-corrosive objects to lift the plastic “shelf” clear of the water. The document is placed on a piece of spun-bonded polyester web, such as Reemey or Hollytex, and the tray is covered with a sheet of Perspex or Plexiglass.
With all humidification methods, you should periodically check inside the containers and wipe away any condensation that may fall directly on the documents.
Photographs
Basic remedial treatments for photographs are similar to those for paper, only more complex. Before treatment, the type of photograph must be identified and the condition of the material, emulsion, and support evaluated. A trained technician can conduct some basic cleaning and repair. A conservator should be consulted for problems of mold, pressure-sensitive tape, aqueous cleaning, brittle or broken mounts, remounting, strong curling, and extensive tears.
Surface dirt and dust on photographic prints, which can be abrasive or can contaminate new enclosures, should be reduced by brushing the recto and verso gently with a soft clean brush. Care must be taken to not abrade or scratch photographs during cleaning. Photographs with delicate or flaking emulsions are easily damaged.
Erasers may be used on some types of photographs to further reduce dirt. Photographs should be evaluated individually to determine if eraser cleaning is appropriate and safe. Photographs can be damaged by chemicals in erasers like sulfur, chlorine, peroxides, oils, plasticizers, and abrasives. These contaminants may fade or stain the image and damage emulsions and supports. For this reason, the Staedtler Mars plastic eraser is preferred. Erasers can be used in block or ground form; ground erasers may be more gentle and give a more even cleaning, but they are also more likely to be lodged in cracks in emulsions. Cleaning sponges, which contain sulfur, should not be used on photographic materials.
The versos of photographs and mounts and non-image areas can be cleaned as described for paper. It may be possible to clean the photograph itself, but only after testing in an inconspicuous area.
Minor tears, creases, and weak areas may be stabilized through individual housing. Surrogates (digital copy, photocopy) can be made to reduce additional damage to photographs in poor condition. If tears must be repaired, the repair method described for paper can be used with care on mounts and the verso of photographs. Some photographs are sensitive to moisture, so the type of photograph and the water sensitivity of the emulsion should be evaluated. The repair tissue should be free of bleach,lignin, and other contaminants.
Books
 Book collections should be regularly cleaned to remove dust and discourage insects and mold. Although most library collections have books on the shelf that are damaged or have deteriorated, the books may be of little current interest to readers. The best way to ensure that treatment is being applied to the books in demand is to establish a system for monitoring them immediately after they are returned to the circulation desk. Non-circulating books should be monitored prior to reshelving from the reading tables. Circulation staff should be trained to recognize damage and deterioration and then to transfer the books to a location where the necessary remedial action can take place. This is usually a book repair unit. Damaged books should be sorted to determine the correct course of action.
If a book:
• Has non-brittle paper, is not rare, and has a text block that is intact, it is ready for basic repair.
• Has brittle paper (usually determined by a double corner fold), it must be set aside for Reformatting.
• Bears characteristics suggesting that it is rare or scarce, it should be set aside for an informed decision on treatment.
• Has a broken text block and leaves that are loose and falling out, it should be set aside for major remedial action.
In most libraries, by far the largest percentage of books can be quickly returned to the circulating collection after basic repair.
Tools
Tools for book repair consist of a flat-bladed paper knife, a bone folder, scissors, a binder’s sewing needle (any long needle will do), a scalpel, a ruler, glue brushes, a sanding stick, and an awl. Materials consist of polyvinyl acetate (PVA) adhesive, kraft or wrapping paper (preferably acid-free), acid-free folder stock, bookcloth, a sized cotton hinge material, and linen thread. All paper and cloth should be used with the grain direction parallel to the book’s height.
Basic repairs
A full repair is necessary when one or both covers are detached, the spine is loose or detached, and either joint is damaged.
Play slideshow of full repair.
A partial repair is necessary when the spine is detached, loose, or tattered but the boards and end sheets are intact.
Play slideshow of partial repair.
Book repair operations can be organized to take advantage of batch processing methods. Large quantities of spine liner strips and spine inlay strips can be cut in graduated widths, and bookcloth can be similarly cut to two standard widths of 8 and 11 centimeters. The repairs can be done on groups of ten books at a time, with each process being completed on the entire group before moving on to the next step.
Emergency action for rare books
As noted, books that are rare should be treated by a conservator, and books that are brittle should be reformatted. If neither option is available, a simple protective enclosure can be made to protect the book on the shelf. The MM (marginal materials) case is a quick and sound way to produce a customized enclosure. Tools consist of a T-square, ruler, dividers, glue brush, scissors, bone folder and cutting device (board shear or guillotine). Materials consist of acid-free file folder stock and PVA adhesive.
Play slideshow of building marginal materials case.
Repairing adhesive binding bond breaks
Many new books are made up of leaves glued together to form what is called a “perfect” binding. Often the adhesive bond breaks. The book can be easily rebound using double-fan adhesive binding. The spine is lightly trimmed on a power paper cutter to remove old glue. Single-fold endpapers are placed at the front and back of the book, and it is secured in a laying press or similar apparatus with the spine uppermost. There is a commercially available clamp mechanism available from the German Planax company (www.stendahlander.com/planax.html), but most technicians will be able to use clamps or bricks to accomplish the same result.
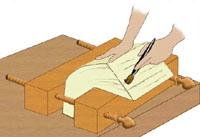 The back edge of the book is fanned and PVA applied to the “steps” of the leaves with a brush. Then the back edge of the book is fanned in the other direction and glue is applied with a brush. The book is removed from the clamp or press and allowed to dry in a stable position. When dry, the spine is lined with a strip of hinge cloth cut to the height of the book by the thickness of the spine plus 4 centimeters. This is adhered to the spine and onto the outside of the endpapers. If the original case is available, it should now be glued back onto the secured text block and pressed or placed under a heavy weight. If the original case is damaged or will not fit, a new case must be made.
Recasing books
In recasing a book, new endpapers are tipped onto the front and back, old linings cleaned off the backbone, and covering materials assembled. Covering materials consist of two boards, cut to the width of the book and its height plus 5 millimeters, and a piece of bookcloth cut to wrap around the book plus 4 centimeters and the height of the book plus 5 centimeters. The grain direction of all materials should run parallel to the spine of the book. A spine strip of file folder stock, a piece of kraft paper spine lining, and a spine lining of hinge cloth is also cut. The text block is prepared by gluing the hinge cloth onto the spine and the endsheets, and gluing the kraft paper liner onto the spine.
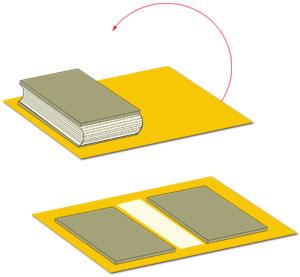 The boards are placed onto the book. The boards are held firmly in place as the book is laid onto one half of the glued bookcloth approximately 2 centimeters from the edge. The other half of the cloth is brought over onto the top board, opened, and the book removed, leaving the two boards adhering to the bookcloth. Center the spine strip of file folder stock between the boards.
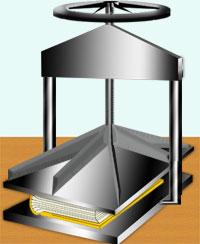 The corners are cut at a 45-degree angle roughly one and a half times the thickness of the board away from the board, and the cloth turned in and rubbed down with the folder. The book is laid into the new case, and the joints are set with the folder. The endpapers are lightly glued to the inside of the case, and the book is pressed.
A paper label can be produced on a computer and attached to the spine.
Sound recordings and electronic/magnetic media
Most remedial treatment for gramaphone/phonograph recordings must focus on cleaning and general care. In handling discs, the surface should not be touched, and it must not come into contact with any surface other than the turntable equipment and the protective sleeve. The radical cleaning of discs, a problematic, controversial process, should be limited to gentle dry surface dusting with a soft cloth in the direction of the grooves. (Click here for a technical discussion of this subject.)